You have to know at a glance about the Facebook platform in the previous
post.
Now it's time for you to taste the Facebook platform. In this tutorial, we will
begin to create a simple Facebook application. Let's get started! In this post,
you will learn how to make an application on Facebook through stages:
- Registration application
- Use Facebook Platform
Registering Your Application on Facebook
Before you start making the application, you must register your application
on Facebook. Why be registered? Because, you need the API Key in making an
application on Facebook. API Key is the key in which your application can
interact with services on Facebook. It kind of password for your
application.
Think of a theme prior to the application that you created. Next consider a
name for the application. The name will be a brand for your application. After
that do registrations. Here are the steps to register the application on
Facebook:
- Open your browser. Point to www.facebook.com / developers.
If you are
not logged in, then the page that appears is the login page. You need to login.
Figure 2.1 shows the front page facebook.com/developers, where you will start
making applications.
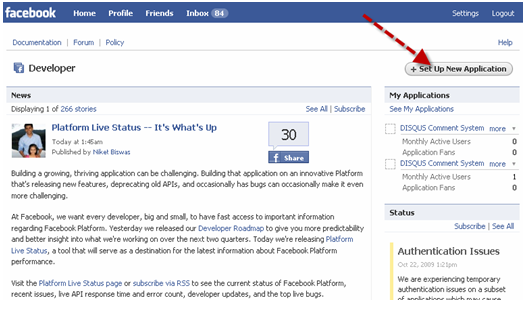
Figure 2.1 Front page facebook.com/developers
- Click the Set Up New Application located in the upper right.
Notice
the arrow in Figure 2.1. Next you will get form as in Figure 2.2.
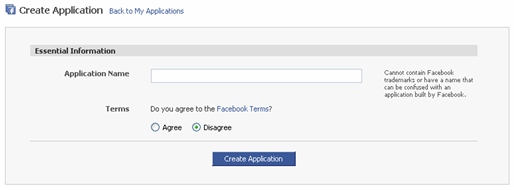
Figure 2.2 Form create new applications
- Enter the name of the application on the Application Name
item.
Consider carefully the use of the name. These names will be the
brand of your application. He will appear on Facebook pages. Suppose that in
this example I named Yumie Tester.
- Select items Agree to declare that you have read and accept the rules
created by Facebook.
If you want to read the rules (Facebook Terms),
click the link Terms Facebook. We recommend that you read to find out the
boundaries of the use of Facebook.
- Click the Create button Application.
Before clicking the Create
Application button, make sure you have selected items Agree. If not, you will
not be able to continue.
After clicking the Create Application button,
you will get an application form setting as you can see in Figure 2.3. If you
look at the left side of the form, a menu will appear. The menu shows the
grouping of items settings.
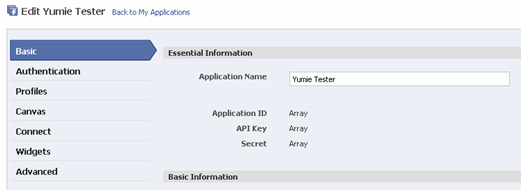
Figure 2.3 application settings menu
Well, we'll start from setting the basic things in the Basic menu.

Figure 2.4 form the basic settings
- Write a brief description of your application is on the Description
field.
Make a statement with the marketing language. Make it interesting
and gives a clear picture of the application. The hope, could attract a lot of
Facebook users to use the application.
- To display your application icon, click the link Change your
icon.
This step is optional. You may pass. But if you do, you'll get a
form as shown in Figure 2.5.
Click the Browse button to take a picture
you want to make icons. Image format that you can upload a JPG, GIF, or PNG.
File icons are also not exceed 5 MB. Size to be used is 16 x 16 pixels. If your
image exceeds the size will be adjusted by Facebook.
Check the item "I
certify that I have the right to distribute this photo and that it is not
pornography". Next click the Upload Image button. Wait a few moments. Once
successful, the icon will appear on your setting page.
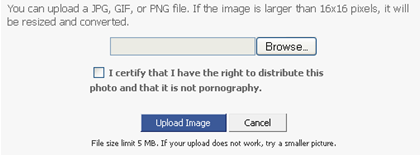
Figure 2.5 form to upload icon
- If you want to display the logo, click the link Change your
logo.
This step is also optional. You can upload your logo or not. If you
click on the link to upload a logo, you will get the form as shown in Figure
2.6.
Feel free to upload your logo image. Images can be formatted JPG,
GIF, or PNG. Not exceed 5 MB. Maximum size 75 x 75 pixels. If more than would be
adjusted by Facebook. Check the item "I certify that I have the right to
distribute this photo and that it is not pornography". Next click the Upload
Image button.
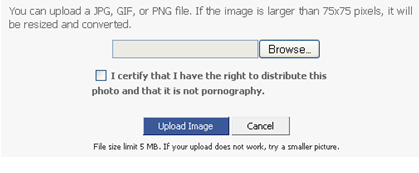
Figure 2.6 Form to upload a logo
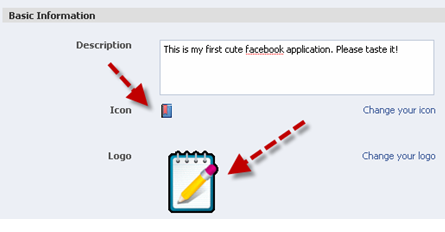
Figure 2.7 Picture icons and logos successfully
uploaded
- If developernya more than one, you can add them to Developers
field.
In this field, you can add more than one developer. Way by typing
in a name other than your developers. You can register more than one
name.
- Write your email in Developer Contact Email Address and User
Support.
This is a medium of communication between the user and your
application as an application developer. Through this channel, you will get
feedback from your users. By default, will be listed email address you used to
register on Facebook. But you can replace the need for this application
alone.
- Click the Canvas menu.
There is some information that we deliberately
let the first. The target here, you can create applications quickly without
having to mess around a lot of settings. Detailed settings we will discuss as we
develop the application.
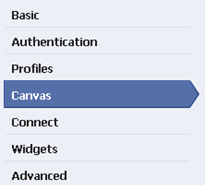
Figure 2.8 menu item Canvas
- In item Canvas Page URL, add the name as the URL of your application in
facebook.
This URL must be unique. There should not be the same
application. Suppose that in this example I use the name "yumietester". So your
URL application http://apps.facebook.com/yumietester/.
- On Canvas items Callback URL, type the address where you save your
application.
Address here is the address of the server / hosting where
you save the application. For example, http://fb.geniofam.com/ app. Facebook
will access the page and retrieve content from that page.
- Render Method on the item, choose FBML.
Here we will use in making
FBML Facebook application page.
- Click the Save Changes button.
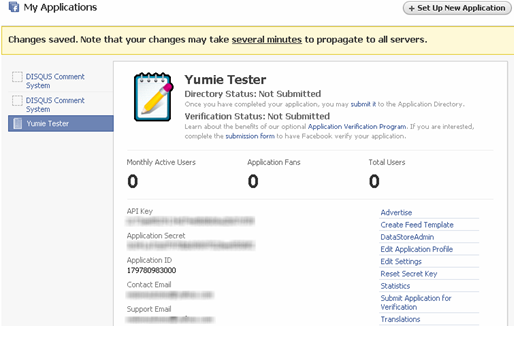
Figure 2.9 Registration successful application
After saving these settings, you'll get a page like in Figure 2.9. In this
page, you will find information on your application ID, IP Key and Application
Secret. We recommend that you store the information meetings. That is the
password for your application to communicate with the Facebook
servers.
Getting Client Library File
Before you begin creating applications, you need a Facebook Client Library
first. You must download it from the website Facebook. Here are the steps:
- Download the file in the client library developers http://www.facebook.com/
pages / apps.php.
Find the download link at the bottom right. Click the
link Download the Client Library.
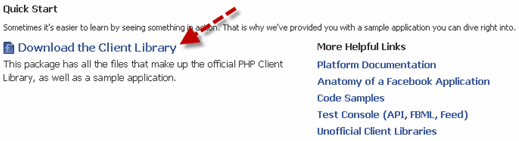
Figure 2.10 Link to download the client library file
Save the file to your local computer.

Figure 2.11 Download client library file
- Next extract (uncompress) the file.
You can use winrar or 7-zip to
extract the file. After you extract, you will get a structure like Figure
2.12.
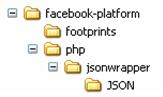
Figure 2.12 client library file structure after the
extracted
You'll get a folder called facebook-platform. Inside the folder are two
folders:
- footprints are examples of Facebook applications at PHP5.
- php is the folder that contains the PHP 5 library files .
Upload
all the files to your server.
Upload Client Library Files to Server
Here I will demonstrate how to upload files to the server. The assumption,
you have CPanel facilities in your hosting. I have a domain name geniofam.com.
The application will be placed on the subdomain fb.geniofam.com/app. The
following steps create a subdomain to start uploading the file:
- Open your domain cpanel page.
Suppose that in this exercise I use a
domain geniofam.com. So to access cpanel address will be used
http://www.geniofam.com/cpanel. You'll get a form to sign. You need to
login.
- Open the pages of your subdomain.
After successful login, you will
get the main page CPanel. Find the link on the Domains Subdomains.
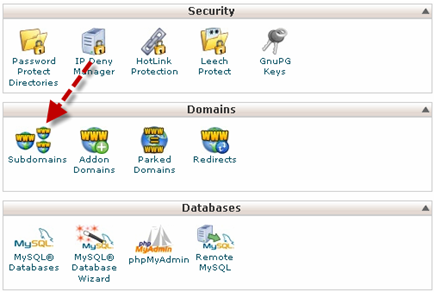
Figure 2.13 Link subdomains on cPanel main page
- Create a new subdomains.
You'll get a form to create a subdomain. The
number of subdomains you can create depends on the hosting policy (and of course
the package you choose).
Fill in the name of the item Subdomain
subdomain. While the document root is automatically written to the access path
to the root of your subdomain. Click the Create button.
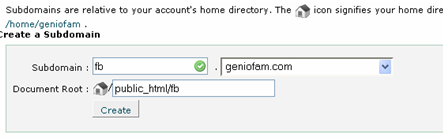
Figure 2.14 Creating a new sudomain
- Back to front page CPanel.
We will create an FTP account for your
subdomain. For that go back to the front page CPanel.
- FTP Accounts Open page.
FTP Account link found on the Files. Next
you'll get a form to register a new account as shown in Figure 2.16.
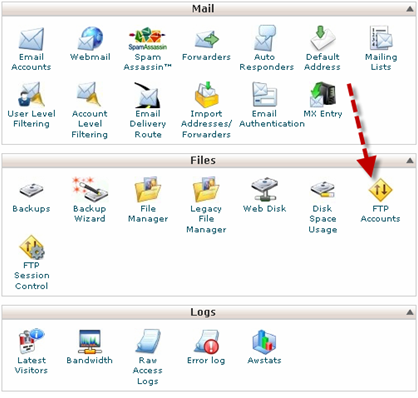
Figure 2:15 Link to this page FTP Accounts
- Write down the username for the new account.
Login item, type the
username for the new account. If you're going to use it, then it merged with
username @ domainname. For example, fb@geniofam.com.
- Specify the account password.
Enter the password for the account
password on the item. Below the input box there are indicators that indicate
whether a password is a strong password (not easily guessed) or not. Use a
combination of letters, numbers and spaces. If you do not want to worry about
passwords, please click the Generate Password button.
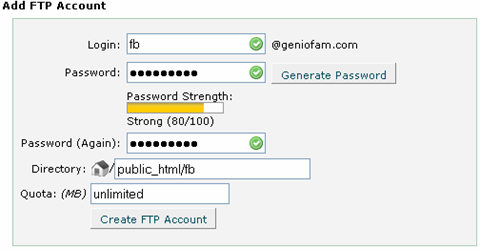
Figure 2.16 Form add FTP accounts
- Repeat password.
Retype the password in Password field (Again). This
is to ensure that you remember the password that you specify.
- Determine the subdomain directory.
If you only allow them to access
the ftp account specific subdomain the subdomain directory list. Consider three
steps.
You can specify a disk space quota for the account. If not, you
can let the unlimited.
- Click the Create FTP Accounts.
Wait a while until the new FTP
accounts created. If successful, you will get a view as in Figure 2.17.
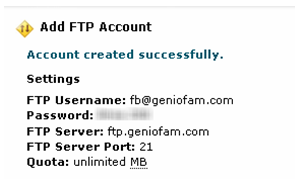
Figure 2.17 FTP Accounts successfully created
- Open your FTP program.
There are many FTP programs you can use. Here
I use Fire FTP. An add-on (extra program) for Mozilla FireFox Brower. You can
get it in http://fireftp.mozdev.org/. I love the Fire FTP, because it integrates
with the FireFox browser. Although there are limitations in the feature.
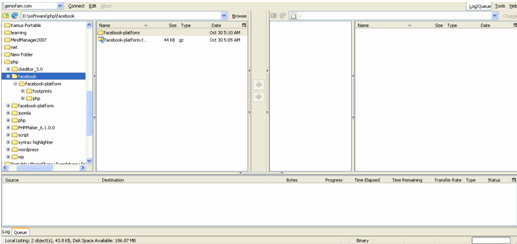
Figure 2.18 Fire FTP FTP program in a FireFox browser
- Upload Client Library File.
Alternatively, you can use the included File Manager in CPanel. Here are the
steps:
- Click the File Manager link on the main page CPanel.
File Manager
link located in the Files group. If you use this, you do not need to unpack
first. Because cPanel has a facility to extract the compressed file.
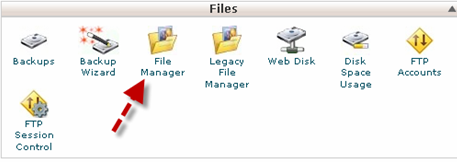
Figure 2.19 Link to the File Manager
- Select the Document Root for subdomains.
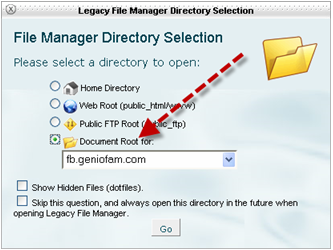
Figure 2.20 Selecting a subdomain
After clicking
the File Manager, you will get a dialog box. Choose Document root for the
subdomain you have created. Thus, the file manager will automatically display
the file structure on the subdomain.
- Create a new folder named "app".
Once entered into the page file
manager, a direct position on the subdomain you choose. In the subdomain
directory has only cgi-bin directory.
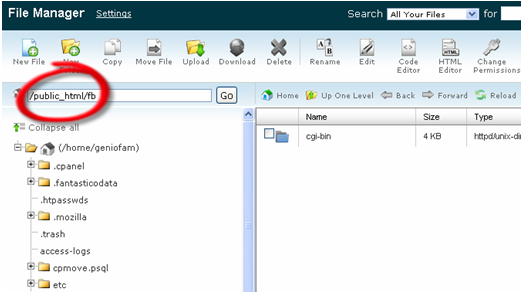
Figure 2.21 The position in subdomain fb
Click the New
Folder button to create a new folder. The button is in the toolbar at the
top.
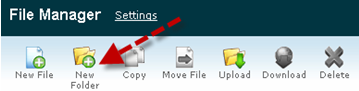
Figure 2.22 key create a new folder
After clicking
the button on the toolbar, you'll get a dialog box. Write the name of the new
folder on the New Folder Name the item. After that, click Create New Folder
button.
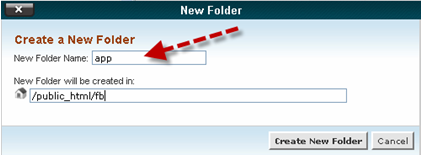
Figure 2.23 Creating a new folder named app
- Open the app folder.
App folder you created successfully. To upload a
file in the app folder, you must open the folder first. Way by double-clicking
on the folder app.
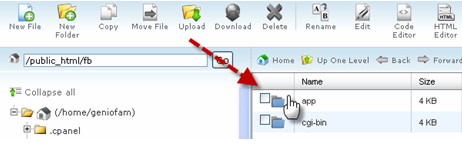
Figure 2.24 Creating a folder app
- Opening the upload page.
After opening the app folder, now it's time
you upload a file compression client library. Click the Upload button on the
toolbar.

Figure 2.25 key file upload
- Upload file client library.
After opening upload page, click the
Browse button. Select a file compressed client library that you want to upload.
Once successfully uploaded, you will get a sign like in Figure 2.27. Close the
upload page. Return to the page file manager.

Figure 2.26 Form upload files
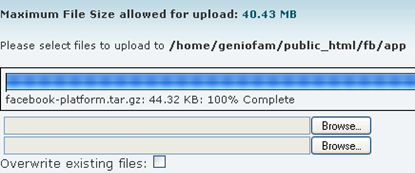
Figure 2.27 File successfully uploaded
- Extracts client library files.
You should already have a file on the
client library in the file manager. If not appear, you can click the Reload
button.
After a look, click the file, then click the Extract button on
the toolbar.
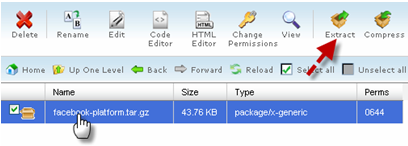
Figure 2.28 Select a file to be extracted
After
clicking the Extract button, you'll get a dialog box. Click the Extract File (s)
in the dialog box.
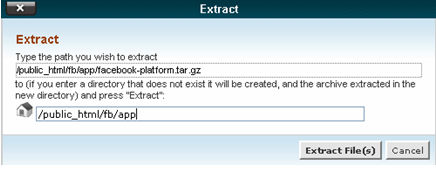
Figure 2.29 a confirmation dialog box to extract the location
of the file
Wait a few moments to appear the dialog box that displays a
list of files extracted. For example you can see in the picture
2:30.
Click the Close button to close it.
You've managed to upload
and extract the client files on the library web server. Now you're ready to
create your first Facebook application.
Next we will begin to
write the code. Usually, I write computer code using an editor like Dreamweaver.
After that just upload the web server. Techniques such as uploading the files we
have done the above. So, we will not be discussed again.
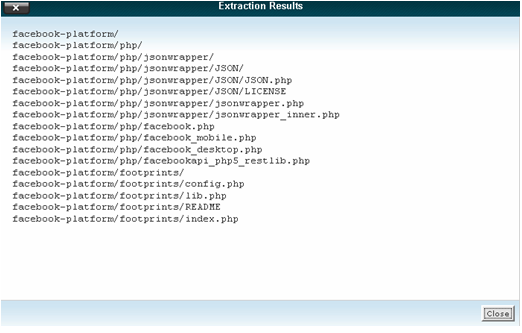 Figure 2.30 The results of the extraction of client library
files
Figure 2.30 The results of the extraction of client library
files
Build My First Simple Application
Now you're ready to write your first code. Create a new file named index.php.
Write the following code:
04 |
$api_key = '2c73ae8529134aaaaaaaaaaaaaaaaaaa'; |
05 |
$secret = '3c041a7cbd797aaaaaaaaaaaaaaaaaaa'; |
07 |
include_once './facebook-platform/php/facebook.php'; |
09 |
$facebook = new Facebook($api_key, $secret);
|
10 |
$user = $facebook->require_login(); |
14 |
Hello <fb:name uid='<?php echo $user; ?>' useyou='false' possessive='true' />! |
15 |
Wellcome to Yummie
Tester! |
Upload the file
on your web server. Put under the app folder.
To test this, point your
browser to http://apps.facebook.com/yummietester or name that you have
registered. The next display will appear as in Figure 2.31.
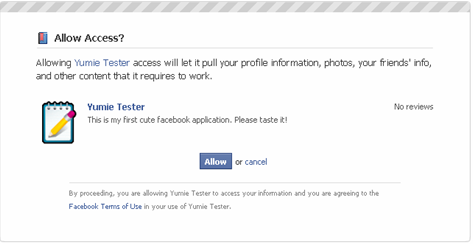 Figure 2.31 Confirmation of application will access your
data
Figure 2.31 Confirmation of application will access your
data
Click the Allow button to allow you to open the application. Next
you'll get a view like Figure 2.32.
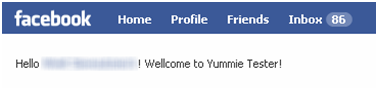 Figure 2.32 A preview of Yummie Tester
Congratulations you have successfully created a simple application on
Facebook.
Showing Friends
After a successful showing simple application, we will
try to make it a little more cool. Ie, by displaying a list of your friends.
Change the code in index.php in app became like this:
04 |
$api_key = '2c73ae8529134d74eaaaaaaaaaaaaaaa'; |
05 |
$secret = '3c041a7aaaaaaaaaaaaaaaaaaaaaaaaa'; |
07 |
include_once './facebook-platform/php/facebook.php'; |
09 |
$facebook = new Facebook($api_key, $secret);
|
10 |
$user = $facebook->require_login(); |
13 |
<h1>Yummie Tester</h1>
|
14 |
Hello <fb:name uid='<?php echo $user; ?>' useyou='false' possessive='true' />! <br> |
15 |
Your id : <?php echo $user; ?>. |
17 |
You have several friends:<br>
|
19 |
$friends = $facebook->api_client->friends_get();
|
24 |
foreach($friends as $friend){ |
25 |
echo "<li><fb:name uid=\"$friend\"
useyou=\"false\"></li>";
|
Code
to display the friend is located at:
1 |
$friends = $facebook->api_client->friends_get();
|
2 |
foreach($friends as $friend){ |
3 |
echo "<fb:name
uid=\"$friend\" useyou=\"false\">";
|
After
you run, you will get something like this:
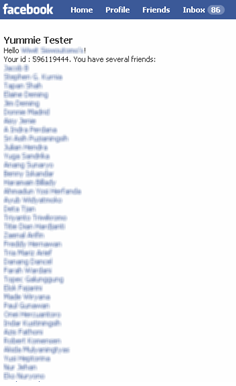 Figure 2.33 Displaying a list of friends
Application Profile
Every application has an application of a profile
page. On this page you can put information on the application. In addition, on
the same page, there is a wall where users can interact with each other. One
example can you see in Figure 2.34. This page is your front application
information page. There is a wall where visitors and users can interact.
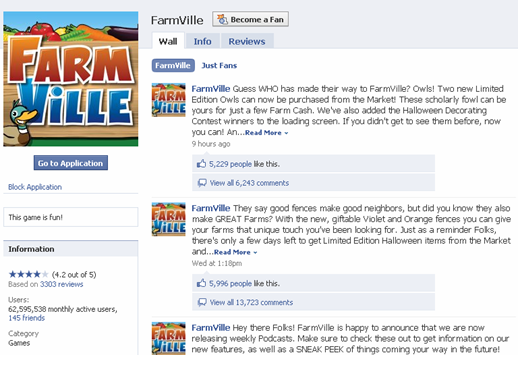 Figure 2.34 About page of a gaming application
To
view the profile page of your application, you can follow the steps
below:
- Open http://www.facebook.com/developers address in your browser.
- Click on the link See My Applications.
After clicking the link, you
will get a list of pages that you create the application.

Figure 2.35 Link to go to the application list pages
- Select the application.
In the application list page, there may be
some applications that you have created. Choose an application you want to see
the profile.
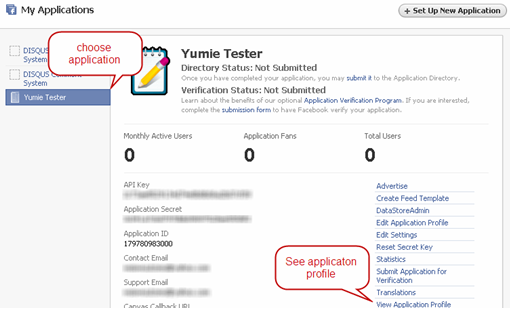
Figure 2.36 page list of applications
- Click the link View Application Profile.
To edit the information in
the application profile, you can click the Edit Application Profile.
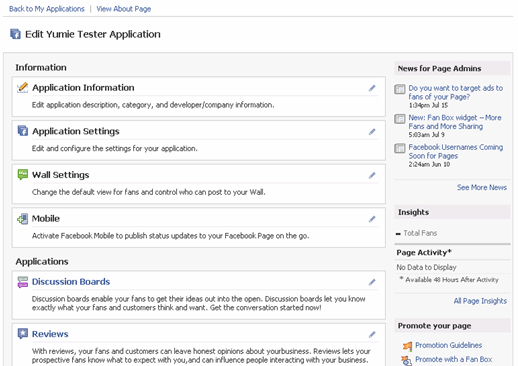 Figure 2.37 The main page to edit and configure the
application profile page
Figure 2.37 The main page to edit and configure the
application profile page
For example, we will try to edit the
application information. For that click the pencil icon in the Application
Information. Select the edit link in the popup menu that appears.
You'll
get a page to edit the application information as in Figure 2.38.
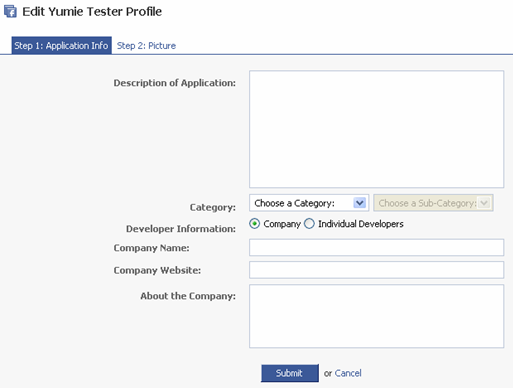 Figure 2.38 Form editing application information
The following information from the form above:
- Description of Application is an explanation of the application that you
create.
The explanation should include usability, features, and benefits
of application you create. The more solid the more you make a good
sentence.
- Select the appropriate category for your application in Category.
If
you make just for practice, you can not fill it. But if you create a real
application, you should choose the appropriate category for the
application.
- Select whether the information the company or individual developers to be
shown on the items Developer Information.
If you choose Individual
Developers, then that will appear is a list of developers who build these
applications. Developer's name has been at the time you filled out an
application configuration. Next you are asked to fill in an explanation of these
developers.
- Fill in your company name Company Name item. You can fill out the
information a company or organization that embodies the developers.
- Write the company's website at items Company Website. If the company or
organization has a website, you can publish it.
- Explain about the items the company About the Company. You can expose a
company profile or your organization in this field. Here, you can all your
company's promotion of it.
After that, you can click the submit
button to save the changes that information.
To change or add a logo, you
can click the tab Step 2: Picture.
Previous:
Facebook Programming: Facebook Platform 
No comments:
Post a Comment