Showing posts with label vSphare. Show all posts

Saturday, May 18, 2013

VMware Server 2.0

VMware Server 2.0


The VMware Server User’s Guide provides information about installing and using VMware Server 2. This Blog is intended for anyone who needs to install, upgrade, configure, or use VMware Server. VMware Server users typically work in small‐ and medium‐sized businesses, doing software development and testing or working with multiple operating systems or computing environments. Users include software developers, QA engineers, trainers, salespeople who run demos, and anyone who wants to create virtual machines.


Contents....

VMware Server 2.0 Introduction and System Requirements

Installing VMware Server 2.0

Learning VMware Server Basics: Using VI Web Access

Upgrade VMware Server

Creating and Upgrading Virtual Machines


Saturday, March 23, 2013

VMware Server

   VMware Server is a free-of-charge virtualization software server suite developed and supplied by VMware Inc.
   VMware Server is a free virtualization product for Microsoft Windows and Linux Servers. It enables you to quickly provision new server capacity by partitioning a physical server into multiple virtual machines. You can use VMware Server to provision a wide variety of plug-and-play virtual applications for commonly used infrastructure.

VMware Server 1.0
   VMware released version 1.0 of server on 12th July, 2006, replacing the discontinued VMware GSX Server product line. VMware Inc. continued to develop the VMware Server 1.0.x series, issuing a maintenance release (version 1.0.10) on 26th October 2009.

VMware Server 2.0
   VMware Server 2.0 runs on several server-class host operating systems, including different virsions of Microsoft Windows Server 2000, 2003 and 2008 and mainly enterprise-class Linux. VMware Server 2.0 uses a web-based user interface, the VMware Infrastructure Web Access, instead of a GUI. For web interfaces, VMware Server 2.0 and VMware vCenter 4 use the Tomcat 6 Web Server.
   VMware Server 2.0 supports the following hardware and software....
  • Any standard x86-compatible or x64-compatible personal computer.
  • A wide variety of Windows, Linux, Solaris and other guest operating systems, including 64-bit operating systems.
  • Two-way Virtual SMP.
  • Intel Virtualization Technology (Intel VT).
  • AMD-Virtualization (AMT-V).
With VMware Server 2.0, you can do the following...
  • provision a new server without purchasing more hardware by locating multiple virtual machines on the same host.
  • Run Windows, Linux and other operating systems and applications without software conflicts because virtual machines are completely isolated from one-another and from the physical host.
  • Move virtual machines from one physical host to another without having to reconfigure them.
Note:-
  1. The physical computer on which you install the VMware Server software is called the host computer, and its operating system is called the host operating system.
  2. The ooperating system is running inside a virtual machine is called a guest operating system.

Requirements:-
Host Computer's Requirements
a. Processors
  • Standard x86-compatible or x64-compatible server with up to 16 processors. Hosts with 32-bit IA-32 processors and IA-32 processors with 64-bit extensions are supported.
  • 733MHz or faster CPU minimum
  • Intel Xeon:- Dual-Core, including 5000 series (Dsmpsey), 5100 series (Woodcrest), 3000 series (Conroe), 7000 series (Paxville MP), and Quad-Core, including 5300 series (Clovertown).
  • Intel Core 2, including E6300, E6400, E6600 and E6700 (Conroe), Q6600, Q6700/E(Kentsfield) and E4300 (Allendale) series.
  • AMD Opteron 1000/2000/8000 series (Santa Ana, Santa Rosa).
  • AMD Athlon 64X2/X2 (Manchester, Toledo, Windsor, Brisbane).
b. Memory:- You must have a minimum of 512MB of memory (2GB is recommended). The total amount of memory you can assign to all virtual machines running on a single host is limited only by the amount of memory on the host computer.
c. Disk Drives:-
  • IDE and SCSI hard drives are supported. At least 1.7GB free disk space is required for basic installation and you can delete the installer afterwards to reclaim approximately 600MB disk space.
  • IDE and SCSI optical drives are supported. CD-ROM, DVD-ROM drives are supported and ISO disk image files are supported.
  • Virtual machines can connect to the host's floppy drives. Floppy disk image files are also supported.
d. Local Area Network
    • Any Ethernet controller supported by the host operating system
    • Static IP address for your host machine (recommended)
    e. Operating Systems
    • Windows Server 2008 x64 Standard Edition, Enterprise Edition.
    • Windows Server 2008 x86 Standard Edition, Enterprise Edition.
    • Windows Server 2003 x64 Standard Edition(SP1, SP2, R2), Web Edition(SP1, SP2) and Enterprise Edition(SP1, SP2, R2).
    • Windows Server 2003 x86 Standard Edition(SP1, SP2, R2), Web Edition(SP1, SP2) and Enterprise Edition(SP1, SP2, R2).
    • Windows Small Business Server 2003 Standard Edition,R2 and Premium Edition,R2.
    • Windows 2000 Server SP3, SP4 and Advanced Server, SP3, SP4.
    • Mandriva Corporate Server 4 (32-bit or 64-bit).
    • Red Hat Enterprise Linux 5.0, 5.1, AS 4.5, ES 4.5 and WS 4.5 (32-bit or 64-bit).
    • SUSE Linux Enterprise Server 9SP4, 10, 10SP1 and 10.1 (32-bit or 64-bit).
    • Ubuntu Linux 6.06, 6.10, 7.04, 7.10 and 8.04 (32-bit or 64-bit).
    • TurboLinux Enterprise Server 10 (32-bit only).
    Guest (Virtual Machine) Computer's Requirements
    a. Processors:- Same processor as the host computer or as required by guest operating system.
    b. Memory:- Up to 8GB, depending on host computer's memory, virtual machine hardware version and guest operating system support. Total memory available for all virtual machines is limited only by the amount of memory on the host computer.
    c. Graphics:- VGA or SVGA
    d. Disk Drives:-
    • Up to four devices. Any of these devices can be a virtual hard disk or CD/DVD drive. IDE virtual disks up to 950GB. CD/DVD drive can be a physical device on the host or client system, or an ISO image file.
    • Up to 60 Devices. Any of these devices can be a virtual hard disk or CD/DVD drive. SCSI virtual disks up to 950 GB.
    • Up to two 1.44MB floppy devices. Physical drives or floppy image files.
    e. PCI Slots:- 6 virtual PCI Slots can be divided among the virtual SCSI controllers, virtual Ethernet cards, virtual display adapter and virtual sound adapter.
    f. COM Ports:- Up to 4 serial (COM) ports. Output to serial ports, host operating system files or named pipes.
    g. LPT Ports:- Up to 3 bidirectional parallel (LPT) ports. Output to parallel ports or host operating system files.
    h. USB Ports:-
    • USB 2.0 supports is available only for VMware products that support virtual machine hardware version 6 and 7, such as VMware Server 20. and Workstation 6 or later.
    • For USB 2.0 support, your host machine must support USB 2.0. Supports most devices, including USB printers, scanners, PDAs, hard disk drives, memory card readers and digital cameras, as well as streaming devices such as webcams, speakers and microphones.
    i. Keyboard:- 104 keys Windows 95/98 enhanced.
    j. Mouse & Drawing Tablets:- PS/2 mouse, Serial tablets and USB tablets.
    k. Sound:- Sound output and input on host system only.
    l. Ethernet Cards & Networking:-
    • Up to 10 virtual Ethernet cards in hardware version 6 and 7 virtual machines. A PCnet-PCI-II compatible. For 64-bit guests: Intel Pro/1000 MT Server Adapter compatible.
    • Support for 10 virtual network switches on Windows host operating systems and support for 255 virtual network switches on Linux hosts. Three switches are configured by default for bridged, host-only and NAT networking.
    • Support for most Ethernet based prorocols, including TCP/IP, Microsoft Networking, Samba, Novell Netware and Network File System (NFS). Built-in NAT supports client software using TCP/IP, FTP, DNS, HTTP and Telnet, including VPN support for PPTP over NAT.
    m. Operating Systems:-
    • Windows Server 2008 Standard Edition and Enterprise Edition (32-bit or 64-bit)
    • Windows Vista Business Edition and Ultimate Edition (32-bit or 64-bit)
    • Windows XP Professional (32-bit or 64-bit)
    • Windows Server 2003 Standard Edition, Web Edition and Enterprise Edition (all 32-bit or 64-bit)
    • Mandrake Linux, Mandriva Linux, Red Hat Enterprise Linux, SUSE Enterprise Server, openSUSE Linux, Open Enterprise Server (OES), Ubuntu Linux (all 32-bit or 64-bit)
    • Solaris (32-bit or 64-bit)
    • NetWare (32-bit)

    Wednesday, March 20, 2013

    Create Virtual Machine

    Create Virtual Machine in VMware Server 2.0

    1. Log in on VI Web Access
    2. To create virtual machine click on " Virtual Machines in Menu Options" or click on "Virtual Machines in Commands"
    3. Create Virtual Machine will open type Name as you want like Server 2003 and select your datastore where you want to create this virtual machine.

    4. Click Next
    5. On Guest Operating System, select OS manufacturer or version.

    6. Click Next
    7. On Memory and Processors, select memory size and numbers of processors as supported by your guest operating system.

    8. Click Next
    9. On Hard Disk, if you want to create new disk select Create a new Virtual Disk, if you want to use any existing disk select Use an Existing Virtual Disk and if you don't want to crate or add disk select Don't Add a Hard Disk.

    10. Click Next
    11. On properties of New Virtual Disk, select your virtual hard disk size and more options.

    12. Click Next
    13. On Network Adapter, if you want to add a network adapter select Add a Network Adapter and if you don't want to create a network adapter select Don't Add a Network Adapter.

    14. Click Next
    15. On Properties of Network Adapter, select Network Connection (Bridged, NAT and Host Only) and select Connect at Power On.

    16. Click Next
    17. On CD/DVD Drive, if you want to use physical drive of host computer select Use a Physical Drive, if you want to use ISO image select Use an ISO Image and if you don't want to add CD/DVD drive select Don't Add a CD/DVD Drive.

    18. Click Next
    19. On Properties of CD/DVD Drive

    20. Click Next
    21. On Floppy Drive, if you want to use a floppy image select Use a Floppy Image, if you want to create floppy image select Create a New Floppy Image and if you don't want to add floppy select Don't Add a Floppy Drive.

    22. Click Next
    23. On  USB Controller, if you want to add USB select Add a USB Controller and if you don't want to add USB select Don't Add a USB Controller.

    24. Click Next
    25. On Ready to Complete, this describe the summary of selected devices and configuration. If you want to auto power on after creating this virtual machine select Power on your new virtual machine now.
    26. Click Finish.

    Friday, March 15, 2013

    VI Web Access - VMware Server 2.0

    Logging in to VMware Server using VI Web Access
       A user that has permission on the host machine can log in to VMware Server.

    • Open your Web browser
    • Type the URL of your VMware Server installation: 
    http://<host_name or host_IP>:8222 (non-secure log in)

    OR
    https://<host_name or host_IP>:8333 (secure log in)
    • Enter the user name and password, then click Log in


    Overview of VI Web Access
       The VI Web Access page is divided into four main sections: 
    1. Inventory Panel:-Appearing on the left (showing in below figure), this area displays the virtual machine inventory.
    • Click the host to view summary information about VMware Server in the workspace.
    • Click a virtual machine to view summary information about the virtual machine in the workspace.


    2. Workspace:- Appearing on the right ( as showing in below figure), this is the main part of the window.
    • When the host is selected in the Inventory panel, the workspace includes the summary, virtual machines, tasks, events and permissions tabs.These tabs contain detailed information about the VMware Server host and allow you to configure host-wide settings.
    • When a virtual machine is selected in the Inventory panel, the workspace includes the summary, console, tasks, events and permissions tabs. These tabs contain detailed information about various aspects of the virtual machine and allow you to configure them.


    3. Menu Bar:-The menus above the inventory panel provide access to common application and virtual machine operations, including power operations and snapshot and console commands.

    4. Toolbar:- Appearing along the top of the page, these buttons allow you to act on the selected virtual machine, offering one-click access to power operations.

    5. Task Area:- Appearing along the bottom of the page, this area displays tasks recently executed by VMware Server, including host-level configuration changes. You can sort tasks by clicking the column headers. By default, tasks appear in reverse chronological order (most recent tasks first). You can double-click a task to get more detailed information.

    Using the VMware Server Host Workspace
       When the host is selected in the Inventory panel, the workspace displays information about the VMware Server installation, divided into tabs.
    1. Summary:- The General section displays the host system's manufacturer, name, model, processor type and utilization and memory capacity and utilization. The Datastore section shows the name, capacity, free space and location of each datastore. The Networks section shows the name, virtual network(VMnet) and network type of each virtual network.

    2. Tasks:- Displays tasks that the performed by users in the VMware Server host.

    3. Events:- Displays events that occurred in the VMware Server host.

    4. Virtual Machines:- Displays high-level information about the all the virtual machines in the Inventory panel, including processor and memory utilization when the virtual machine is powered on. From this tab, you can create a virtual machine, add a virtual machine.

    5. Permissions:- Displays and allows you to configure permissions for the host.

    Using the Virtual Machine Workspace
       When a virtual machine is selected in the Inventory panel, the workspace displays information about the virtual machine, divided into tabs...
    1. Summary:- Displays performance and status information, You can view a summary of the virtual machine's state, including information about virtual devices and configuration options. Forms this tab, you can modify the selected virtual machine's hardware and perform other virtual machine management tasks.

    2. Tasks:- Displays tasks that users perform in the virtual machine.

    3. Events:- Displays events that occurred in the virtual machine.

    4. Console:- Allows you to interact directly with the guest operating system.

    5. Permissions:- Displays and allows you to configure permissions for the virtual machine.

    Using VI Web Access Menu Options
       VI Web Access menus include the following...
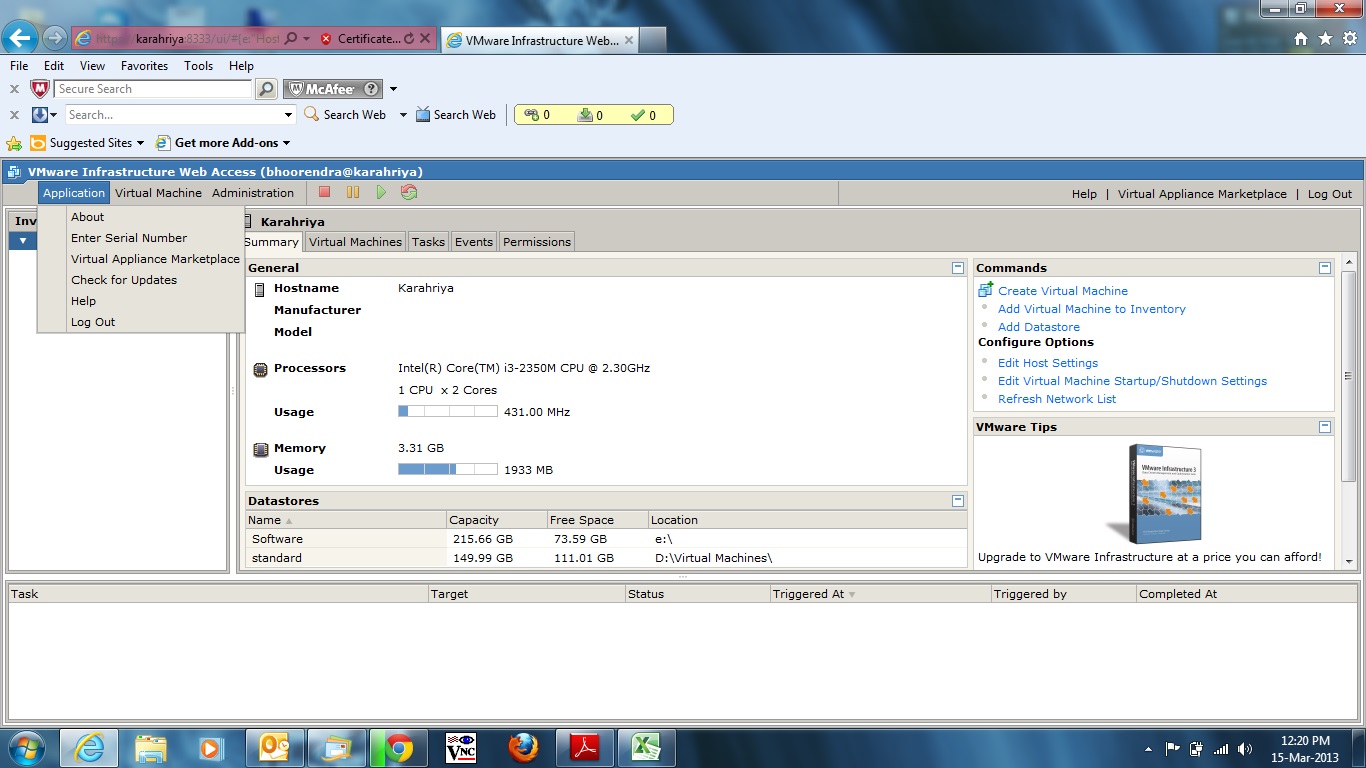
    1. Application Menu:- The Application menu includes general VI Web Access options for getting version information, browsing the Virtual Appliance Marketplace, viewing online Help and logging out. See in below figure
    • About:- Displays the VI Web Access version number, VMware Server version number and VMware copyright information.
    • Enter Serial number:- Allows you to enter a new VMware Server serial number if your current serial number is expiring.
    • Virtual Appliance Marketplace:- Opens the Virtual Appliance Marketplace Web page. virtual appliance are pre-built, pre-configured, ready-to-run enterprise applications packaged with an operating system inside a virtual machine.
    • Check for Updates:- Opens the VMware Server download page.
    • Help:- Displays online help.
    • Log Out:- Logs you out of VI Web Access

    Virtual Machine Menu
       The Virtual Machine menu includes options for managing the power state of a virtual machine and for viewing the console. The virtual machine menu includes as following...
    • Create Virtual Machine:- Starts the new virtual machine setup wizard.
    • Add Virtual machine to Inventory:- Adds a virtual machine to the host Inventory.
    • Remove Virtual Machine:- Removes a virtual machine from the inventory and optionally deletes the virtual machine files. This option is enabled if the virtual machine is powered off.
    • Power On/Resume:- Powers on a virtual machine or resumes a suspended virtual machine.
    • Power Off:- Powers off the virtual machine immediately. This is the same as pulling the plug on a physical computer.
    • Suspend:- Suspends a powered on virtual machine.
    • Suspend Guest:- Suspends the guest operating system. VMware Tools executes the script associated with this power state change, if any.
    • Reset:- Resets the virtual machine immediately. This is the sa,e as pressing the reset button on a physical computer.
    • Shut Down Guest:- Shuts down the guest operating system. VMware Tools executes the script associated with this power state change, if any,
    • Restart Guest:- Restarts the guest operating system and the virtual machine. VMware Tools executes the script associated with this power state change, if any.
    • Take Snapshot:- Takes a snapshot of the virtual machine.
    • Revert to Snapshot:- Reverts to an existing snapshot.
    • Remove Snapshot:- Removes an existing snapshot.
    • Enter Full Screen Mode:- Starts VMware Remote Console in full screen mode.
    • Open in a New Window:- Opens a new VMware Remote Console instance.
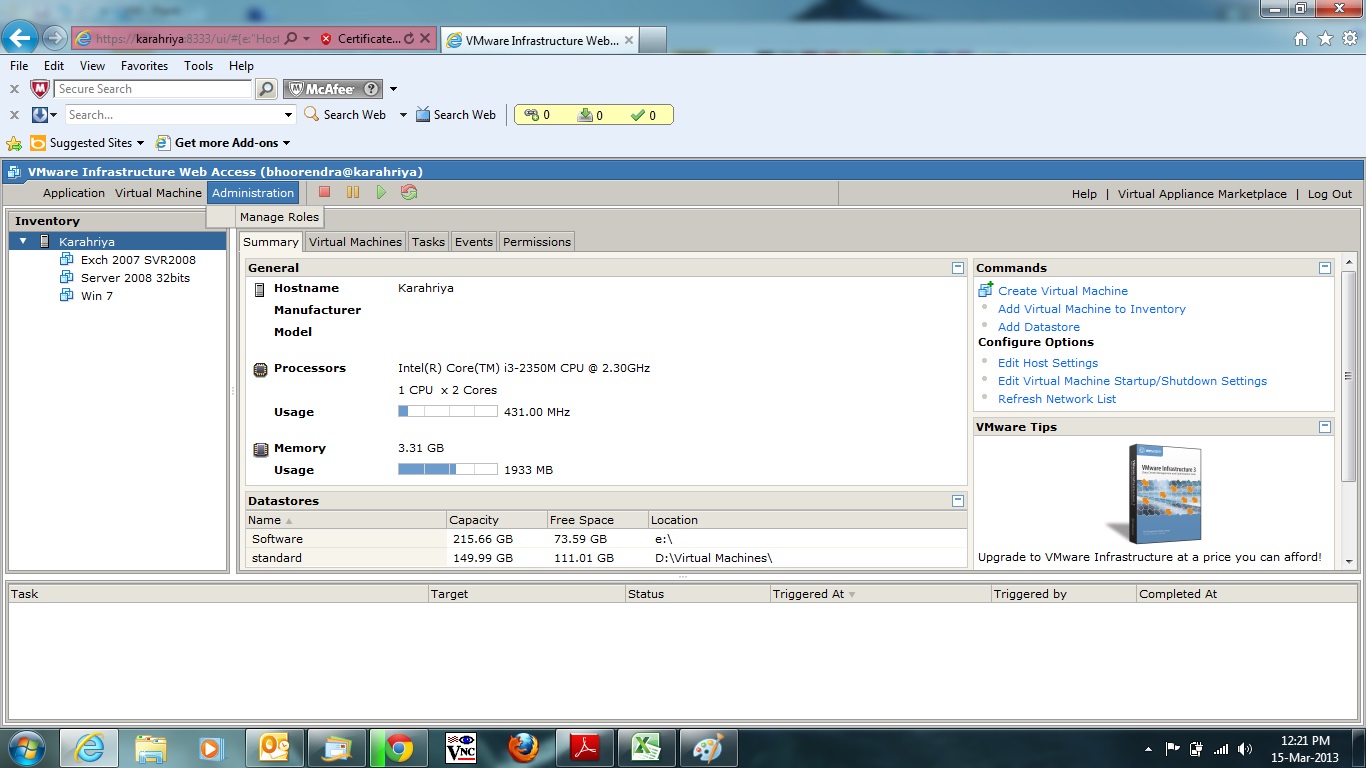
    Administration Menu
       The Administration menu includes the Manage Roles option for managing VMware Server roles. See the following figure.


    Thursday, March 14, 2013

    Upgrade VMware Server

    Upgrading from VMware Server 1.0 to VMware Server 2.0
       
       Run the VMware Server 2.0 installer for your host to upgrade to VMware Server 2.0 from VMware Server 1.0. The installer automatically uninstalls the previous version of the software.

    • VI Web Access and VMware Remote Console replace the VMware Management Interface and VMware Server Console.
    • VMware Server 2.0 does not support physical (raw) disks.
    • VMware Server 2.0 uses datastores to manage virtual machine locations. A datastore is a storage location for VMware Server virtual machine files. The storage location can be the local file system, a CIFS store(Windows only) or an NFS-mounted file system(Linux only).
    • VMware Server 2.0 creates hardware version 7 virtual machines by default, If you want to use all features of VMware Server 2.0, it's recommended that you upgrade virtual machines to hardware version 7.
    • VMware Server 2.0 uses a different permissions model from VMware Server 1.0. After you install VMware Server 2.0, log in as an administrator user to create and manage permissions for non-administrator users.
    • VMware Server 2.0 automatically names both default and custom virtual networks.

    Install VMware Server 2.0

    Installation Prerequisites

       Installing VMware Server is usually a simple process of running a standard installation wizard. Before you begin installation, be sure you have the following....
    1. Compatible host:- Verify that the computer and host operating system meet the system requirements for VMware Server as following....
    A. Processor:- 733 MHz or higher processor is required, including AMD, Intel, etc.
    B. Memory:- Minimum 512 MB of memory ( 2 GB is required).
    C. Disk Drives:- 1.7 GB free space is required to install VMware Server in HDD, standard CD-ROM/DVD-ROM is supported and floppy drives are also supported.
    D. LAN Connection:- Any type of Ethernet controller and static IP address for host computer is recommended.
    E. Operating Systems:- Windows Server 2008 Standard/Enterprise Edition( 32-bit or 64-bit), Windows Server 2003 Standard/Web/Enterprise Edition(32-bit or 64-bit), Windows SBS 2003 Standard/Premium Edition(32-bit or 64-bit), Red Hat Enterprise Linux, SUSE Linux Enterprise Server and Ubuntu Linux.
    2. VMware Server Installation Software:- VMware Server is available for both Windows and Linux host computers. The installation software is in the file you download and you required serial number.
    3. Guest Operating System:- After VMware Server is installed, you need the operating system installation CDs or OS images to set up your guest systems.
    4. Web Browser:- To manage VMware Server using VI Web Access, use a supported Web browser.

    Installing VMware Server on a Windows Host
    1. Log on as the Administrator user
    2. Run the installer from where you save the downloaded VMware Server installation file.
    3. When the wizard finishes computing space requirements, click NEXT to go on next page.
    4. Accept License Agreement, click NEXT to go on next page.
    5. On Destination Folder page, if you want to change Installation Folder, click Change, or if you want to install in Default Folder, click NEXT to go on next page.
    6. Click NEXT.
    7. On the Server Configuration page, if you don't want virtual machine files stored in the directory that is shown, click Change and specify an alternate virtual machine directory.
    8. On the Server Configuration Information page, accept or change the default values for FQDN, Server HTTP Port and Server HTTPS Port.
    9. Also on the Server Configuration Information page, select Allow virtual machines to start and stop automatically with the system if you want to configure virtual machines to start up and shut down automatically when the host operating system starts and shuts down.
    10. Click NEXT.
    11. On the Configure Shortcuts page, deselect any shortcuts you don't want the installer to create.
    12. Click Install.
    13. After installation, insert you serial key to register VMware Server.
    14. Click Finish.
    Install VMware Silently on Windows Host


    1. Extract the administrative installation image from the VMware Server installer.
    VMware-server-<xxxx>.exe /a /s /v TARGETDIR="C:\temp\server" /qn
    2. Run the following command
    msiexec /i "<InstallTempPath>\VMware Server.msi" [INSTALLDIR="PathToProgramDirectory>"] ADDLOCAL=ALL [REMOVE=<featurename, featurename>] /qn
    To install VMware Server in a location other than the default, change the INSTALLDIR path.
    3. Check the installation log file to verify that the installation completed successfully. The file is located in the administrative user's temporary directory, int the format
    vminst.log_<date_and_time_stamp>_<Succes_or_Failed>.log